For our very first Heeltips blog entry, we’d first of all like to welcome all of our returning and first-time customers! Whether you use NewHeelTips.com to save money, to keep wearing your can’t-let-go shoes, or because you’re a regular DIY-er, we hope that this blog will give you some valuable and entertaining information about shoe repair, maintenance, and culture.
This post is all about Heeltip Removal and Pliers Usage. It’s important to mention up-front that your ability to remove the old tip is directly related to how much of that tip is left. A very small, very worn-out tip will be difficult to grip, and possibly brittle and prone to breaking. If the tip breaks you can still remove the pin using pliers; but the other danger involves placement of the pliers. If your tip is very worn-out (or worn out unevenly, as is often the case), gripping just the plastic without accidentally getting the heel can be tricky! A common first-time repair mistake involves gripping the heel along with the tip to be removed. This can result in denting or imprinting grooves into the otherwise smooth heel, which is extremely frustrating. Careful placement will avoid this problem.
One of the first tricks of the trade we discovered here at NewHeelTips.com was the importance of pliers choice in removing the old tip. Those tips are built to stay in, so it can take a bit of muscle to get them out! The right pair of pliers can make sure your muscle isn’t wasted, directing the force of your grip and your pulling so the tip comes out easily without slipping (or you breaking a sweat)!
Not all pliers are built equally – for the best user experience, you’ll want to remove your old tip using some kind of
Slip Joint Pliers. Slip joint pliers allow you to adjust the size of the gap between the plier jaws (those toothy grippers at the front) so that your grip on the tip is flat, not at an angle. Common
two-position straight grip pliers will work just fine; the connoisseur might consider a pair of
tongue-and-groove pliers, also known as adjustable pliers or Channellocks. You will want to use short, flat-nose or round-nose pliers (as opposed to long
needle-nose pliers) for a surer grip. We personally don’t like to use
locking pliers for removing tips; we’ve found that locking the jaws into place can increase slippage (if the jaws are too loose) or deforming / breaking (if the jaws are too tight), but we’ve met others who swear by them. If correctly calibrated so that the grip is strong - but not TOO strong - locking pliers can allow you focus on pulling rather than
squeezing. Locking or not, you’re going to need a solid grip to pull those puppies out.
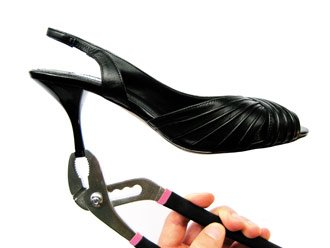
As mentioned above, once you’ve chosen your optimal pliers, placing them correctly on the tip is crucial. Place the jaws slowly and carefully on the old, worn-out tip so that the entire remainder of the tip is being clamped by the jaw, but so none of the jaw is clamped onto the heel! You can see the illustration on our
How-To page for an example – notice how the pliers have the entire tip.
Once you’re confident of the placement, grip the shoe firmly to make sure it doesn’t slip, and watch your fingers so you don’t pinch yourself! It is common for pliers to slip if improperly placed; to prevent this, add pressure slowly as you squeeze good and hard. As we’ve said – these tips are meant to stay in your shoes, and before you can pull them out, you need to have a good grip on them. A good pair of pliers will give you better leverage on the tip, so you won’t have to squeeze so hard, but a solid grip with any pair of pliers ought to do the trick. Once your grip on the old tip is firm, it’s time to pull!
We tend to alternate between three types of pulling until the tip comes out, namely:
- A good, solid, straight-out, away-from-the-heel pull. This takes the most muscle, but will probably be the pull that gets the tip out.
- A very slight twisting and wrist rotation while pulling out. This helps to loosen the tip, but you don’t want to twist the tip around inside the heel! The pin on the heeltip has grooves to keep it from turning around inside the heel; too much twisting during removal (or insertion of the new tip, for that matter) can stop those grooves from sticking in place inside the heel.
- A very slight round circling movement of the whole arm while pulling out. This helps to make sure the tip isn’t jammed in at an angle while pulling out. Don’t put too much circular rotation on the tip, or you could weaken or break the actual heel!
This is a lot of detail for what will almost certainly be a very easy procedure – really, you squeeze and pull! If you don’t feel comfortable pulling the tip out yourself, it’s usually not hard to find someone who enjoys working with tools who will be glad to help with this simple job. Personally, I ask my husband to help – he usually doesn’t care about my shoes, but I hand him a stiletto and a pair of pliers, and he’s suddenly very interested, and happy to appear useful!
With the right set of pliers, a proper grip, and some pulling as detailed above, that old tip will come out flawlessly, and your new tip and rejuvenated shoes will be just a few hammer strokes away!
Hope this helps, and we’d love to hear any tips of your own below! From all of us at NewHeelTips.com – keep on strutting!